DIY candy buffet
For our son's baby dedication, we decided to set up a simple candy buffet for our friends and loved ones to enjoy. Although not everyone has a sweet tooth I was certain I could put together the right combination of candy & desserts to appeal to everyone. Candy buffets became a really popular trend back when I was still in the wedding planning stage and at first I wasn't a big fan of them, but because they are so versatile they can be customized to suite to all sorts of events. I thought it would be the perfect treat for his baby dedication because much of the prep can be done in advance and the actual set up and take down can be done fairly quickly!
The trickiest component of the candy buffet is the bulk candy and the display containers. These two things form the base of the buffet, with other filler items added in for good measure that are easier to obtain. For our candy buffet we used the following items
Bulk Candy (details below)
Candy jars & trays
Ceramic letter dishes
Scoops
Tent cards
Cupcakes
Cupcake stand
Cupcake toppers
Mini donuts
Hershey bars
Hershey kisses
Chinese take-out boxes 8oz, 16oz
Getting the right amount of candy is key, you don't want to run out mid-event but also don't want to have so much left over either. I wanted to go for an all white look with silver accents and decided to order the bulk candy from CandyWarehouse. They have the best combination of quality, taste and price and they will ship our orders with cold packs if it contains candy that can melt. I had heard nothing but good things about them and was not disappointed. Their candy is seriously addictive! They sell complete buffet kits that include everything you would need such as jars, table covers, candy bags and scoops. They also offer small kits that contain a mix of candy by color or you can just build your own kit with only what you want.
Ultimately I wasn't in love with their containers or bags so I decided to go with a smaller 'candy only' kit and add in some extras. To appeal to more people I wanted to have a good range of flavors as well as variety in the type of candy. I ended up going with the following in various shades of white;
2lbs gumballs
60 pcs lollipops
2.75lbs butter mint creams
3lbs vanilla salt water taffy
5lbs chewy sour balls,
5lbs hard candy balls
16 pcs old fashioned ribbon candy.
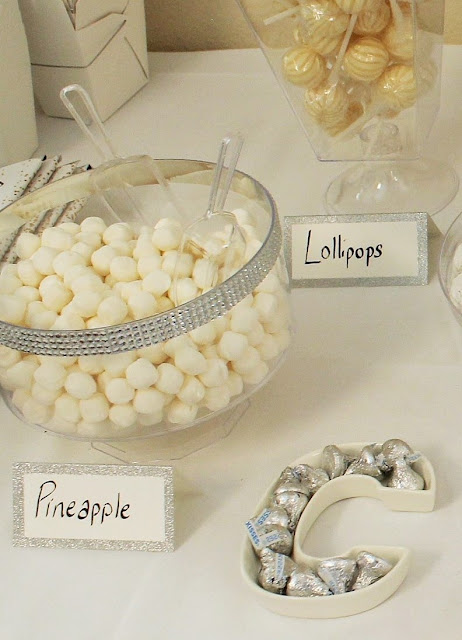
In all it was about 25lbs of candy! Some issues I ran into with Candy Warehouse is that if you buy candy by color you are really limited by flavor too. Most of their white candy is either vanilla, mint or pineapple/pina colada flavor. Not everyone is a fan of pineapple so that's a bit annoying. Additionally they will substitute one type of candy for another without notifying you, so I ordered the swirl ripple lollipops shown above but instead received round sphere shaped pops which don't really have the same look at all.
The good news is the candy is well packaged and protected and arrived quickly and in good condition. Everything was sealed well and intact except the ribbon candy which is pretty delicate and had some broken pieces. This is how it looked when I opened the box.
To keep it fresh I left everything sealed until the day of our event when we set up the candy table. Thankfully it all tasted awesome, and I'm currently trying very hard to avoid eating all the leftovers!
Several other places also sell bulk candy by color such as Oriental Trading and Party City. I nearly ordered from Oriental Trading because I liked the look of their all white kit, but theirs seemed more expensive and their reviews were more mixed. Party City bulk candy is definitely more expensive with less variety but it's a good back up option if you need some on short notice since you can just run into the store to grab some packs.
 |
| All white kit from Oriental Trading |
Once I had the decided on the bulk candy, I needed to get jars and containers to display them. Ideally glass apothecary jars have a nice elegant look as shown below. Additionally glass preserves flavor better and the lids help keep it fresh.
I also considered using over sized mason jars and cookie jars since I'd be more likely to reuse those, but in the end I decided to go with open plastic jars instead. They were the cheaper option and I wouldn't have to worry about them breaking in transit. Additionally I felt the lids would just be a nuisance since it already takes two hands to fill up a box with candy. I went to party city to check out their candy jars and they had a surprisingly good selection. I chose a variety of heights and widths that made sense for the candy I had purchased and would create a nice look together. If the jars are all the same height and size it's harder to arrange them on the table and still be able to see everything. Typically the taller narrower jars are in the back or at the sides with the shorter wider jars in the front and center.
I got the assorted jars below from the candy container section of party city. They are a combination of rhinestone trifle jars and pedestal jars. The mini scoops shown below are 5.5inches long and come in sets of 12 on amazon. They are the perfect size for scooping candy in the take out boxes.
The one thing about having a color themed candy buffet is that it can be confusing for the guests to know which candy is which, so I had to label them somehow. I could have attached labels to the jars but decided to use table tent cards instead and wrote on them by hand.
I really liked the symmetry of the 7 jars I had purchased in that photo above and was reluctant to add anything else to the table that would throw off that symmetry. However I know that not everyone likes fruity or minty candy, and I feel no candy buffet is complete without some chocolate! I considered all white m&ms but decided to play it safe with wrapped chocolate instead, so I went for hershey kisses and hershey bars.
I displayed the kisses in ceramic letter dishes spelling out his name.
Ceramic letter dishes are the cutest thing and best of all they are multi-functional and can be used to display small items like nuts and sweets but can also be used for non-food items like coins and rings or can be propped up as decor anywhere in the home.
I could have printed the candy wrappers myself but found a good deal online that included inner foil packs. So I assembled them using a glue stick to first seal the inner foil pack and then the wrap around label. The embarrassing thing is that the date on all of these were all wrong and said 2018 instead of 2019 🙈 For some reason it was only after the event when my mom was looking at the pictures that she pointed it out to me. Oh well, diy blunders happen sometimes!
Now that I had all the candy figured out, I added two baked items; buttercream frosted cupcakes as a centerpiece and powdered mini cake donuts. At this point I had more than enough to cater to everyone! I added silver cross toppers to the cupcakes and declared it mission accomplished! Some other fun options I could have added instead of donuts would have been white chocolate covered pretzels, yogurt covered raisins, jordan almonds, and popcorn!
Overall it was a fun diy project and my kids were so thrilled to see it all come together!


Comments
Post a Comment